This is an old revision of the document!
Getting started on RoksNet
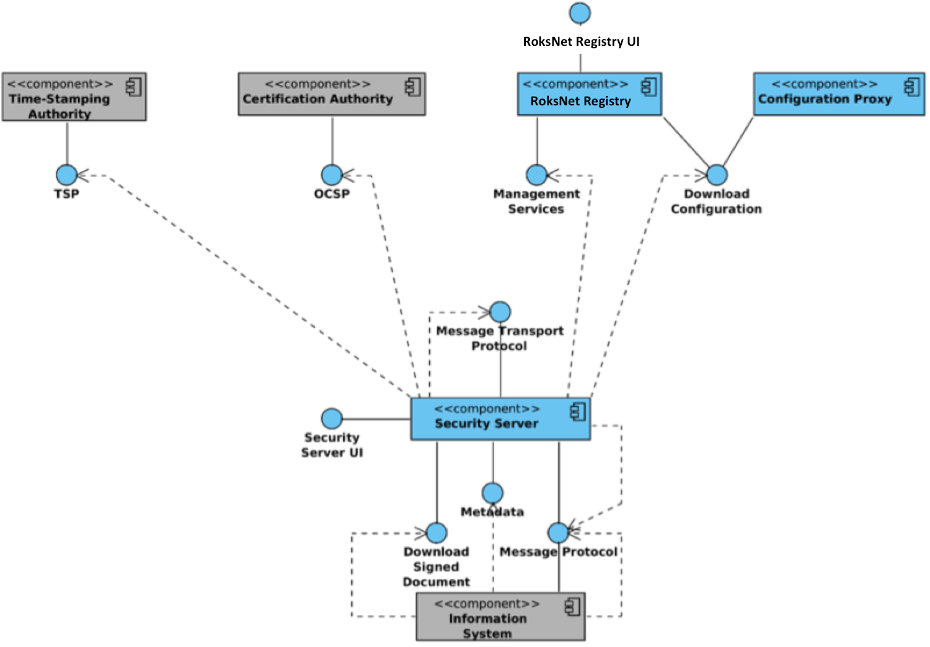
RoksNet utilizes the X-Road components for secure data transfer. The illustration below shows the main components and interfaces of the RoksNet. The components that are not part of the RoksNet core are shown on grey background.
Architecture
Setting up a security server
System requirements
| Requirements | Explanation |
|---|---|
| Ubuntu 14.04 64-bit, 2 GB RAM, 3 GB free disk space | Minimum system requirements |
| http://apt.roksnet.com/xroad6-debs | RoksNet package repository |
| http://apt.roksnet.com/xroad6-debs/roksnet_repo.gpg | The repository key |
| TCP 5500 | Port inbound & outbound for message exchange between security servers |
| TCP 5577 | Port inbound & outbound for querying OCSP responses between security servers |
| TCP 4001 | Port outbound for communication with the central server |
| TCP 80 | Port outbound for downloading global configuration |
| TCP 443 | Port outbound for OCSP and TSA services |
| TCP 4000 | Port inbound for access to user interface (local network) |
| TCP 80, 443 | Ports inbound as information system access points (local network or external via https) |
REQUIREMENTS FOR THE SECURITY SERVER
Minimum recommended hardware parameters:
- the server’s hardware (motherboard, CPU, network interface cards, storage system) must be supported by Ubuntu 14.04 in general;
- a 64-bit dual-core Intel, AMD or compatible CPU; AES instruction set support is highly recommended;
- 2 GB RAM;
- a 100 Mbps network interface card;
- if necessary, interfaces for the use of hardware tokens.
Requirements to software and settings:
- an installed and configured Ubuntu 14.04 LTS x86-64 operating system (VMs are supported as long as they support Ubuntu 14.04 LTS);
- The enabling of auxiliary services which are necessary for the functioning and management of the operating system (such as DNS, NTP, and SSH) stay outside the scope of this guide.
Installing the Security Server
PREPARING THE OS
1. Add system user whom all roles in the user interface are granted to:
sudo adduser username
2. Set operating system locale. Add the following line to /etc/environment:
LC_ALL=en_US.UTF-8
INSTALLATION
3. Add the address of the RoksNet package repository and the nginx repository to to /etc/apt/sources.list.d/roksnet.list:
deb [arch=amd64] http://apt.roksnet.com/xroad6-debs trusty main
deb http://ppa.launchpad.net/nginx/stable/ubuntu trusty main
deb http://ppa.launchpad.net/openjdk-r/ppa/ubuntu trusty main
4. Add RoksNet's repository's signing key to the list of trusted keys:
curl http://apt.roksnet.com/xroad6-debs/roksnet_repo.gpg | sudo apt-key add -
sudo apt-key adv --keyserver keyserver.ubuntu.com --recv-keys 00A6F0A3C300EE8C
sudo apt-key adv --keyserver keyserver.ubuntu.com --recv-keys EB9B1D8886F44E2A
5. Install the security server software:
sudo apt-get update
sudo apt-get install xroad-securityserver
6. During the installation you will be asked to specify the username (added at step 1.) that will be granted the rights to perform all activities in the user interface.
7. The other questions can be answered with their default values as they are detected from the OS.
POST INSTALLATION CHECKS
8. Check if all the processes started. The following services should be running.
sudo initctl list | grep "^xroad-"
xroad-jetty start/running, process 19796
xroad-confclient start/running, process 19563
xroad-signer start/running, process 19393
xroad-proxy start/running, process 19580
9. Ensure that the security server user interface at https://SECURITYSERVER:4000/ can be opened in a web browser. To log in, use the account name chosen during the installation. While the user interface is still starting up, the web browser may display the “502 Bad Gateway” error.
Configuring the Security Server
1. To perform the initial configuration, open the address https://SECURITYSERVER:4000/ in a web browser. To log in, use the account name chosen during the installation.
2. The system will ask for a global configuration anchor file. RoksNet's development environment's anchor can be downloaded from http://apt.roksnet.com/xroad6-debs/configuration_anchor.xml. The hash value for verification is
Hash (SHA-224): 71:3B:88:8C:6B:59:73:29:57:D2:06:8D:BE:A0:FF:F4:E4:E8:E1:D9:3A:A6:8A:75:E3:02:E7:FB
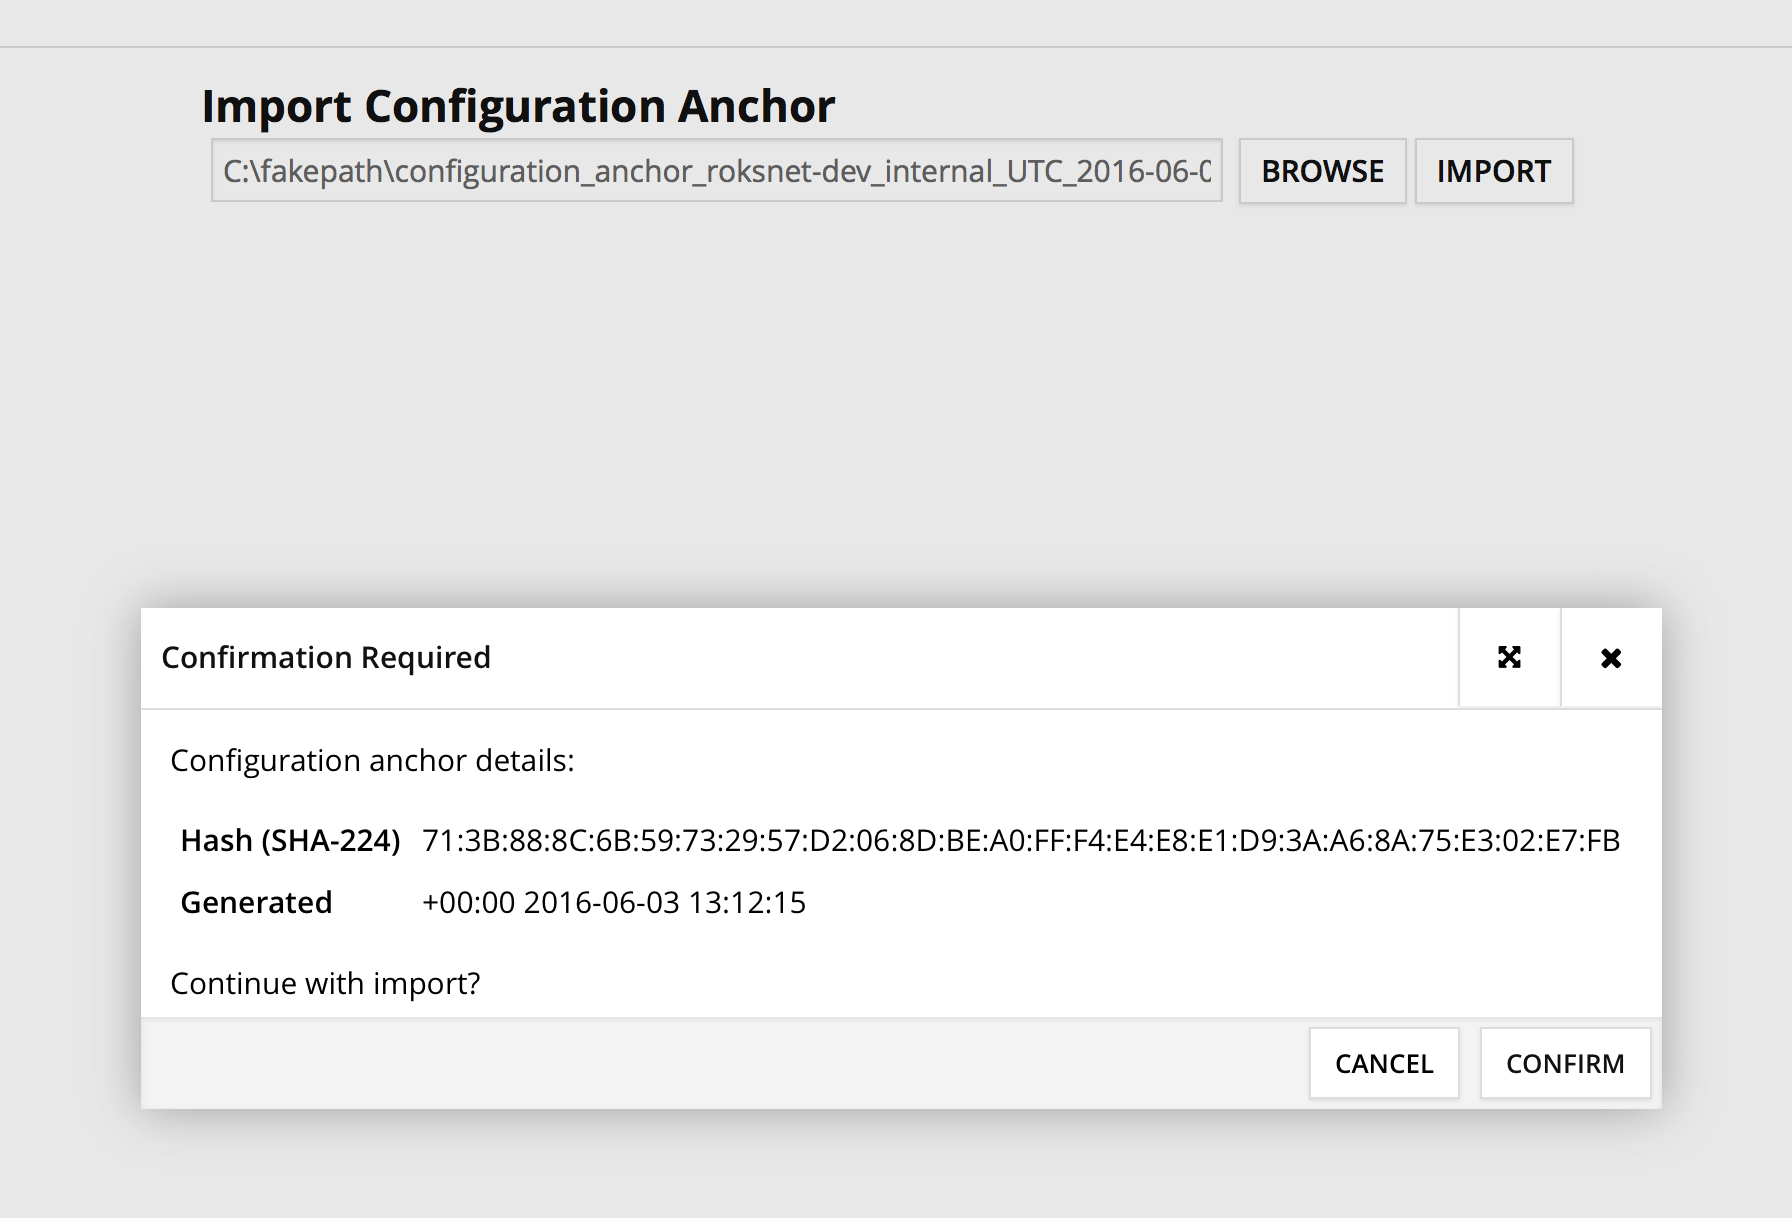
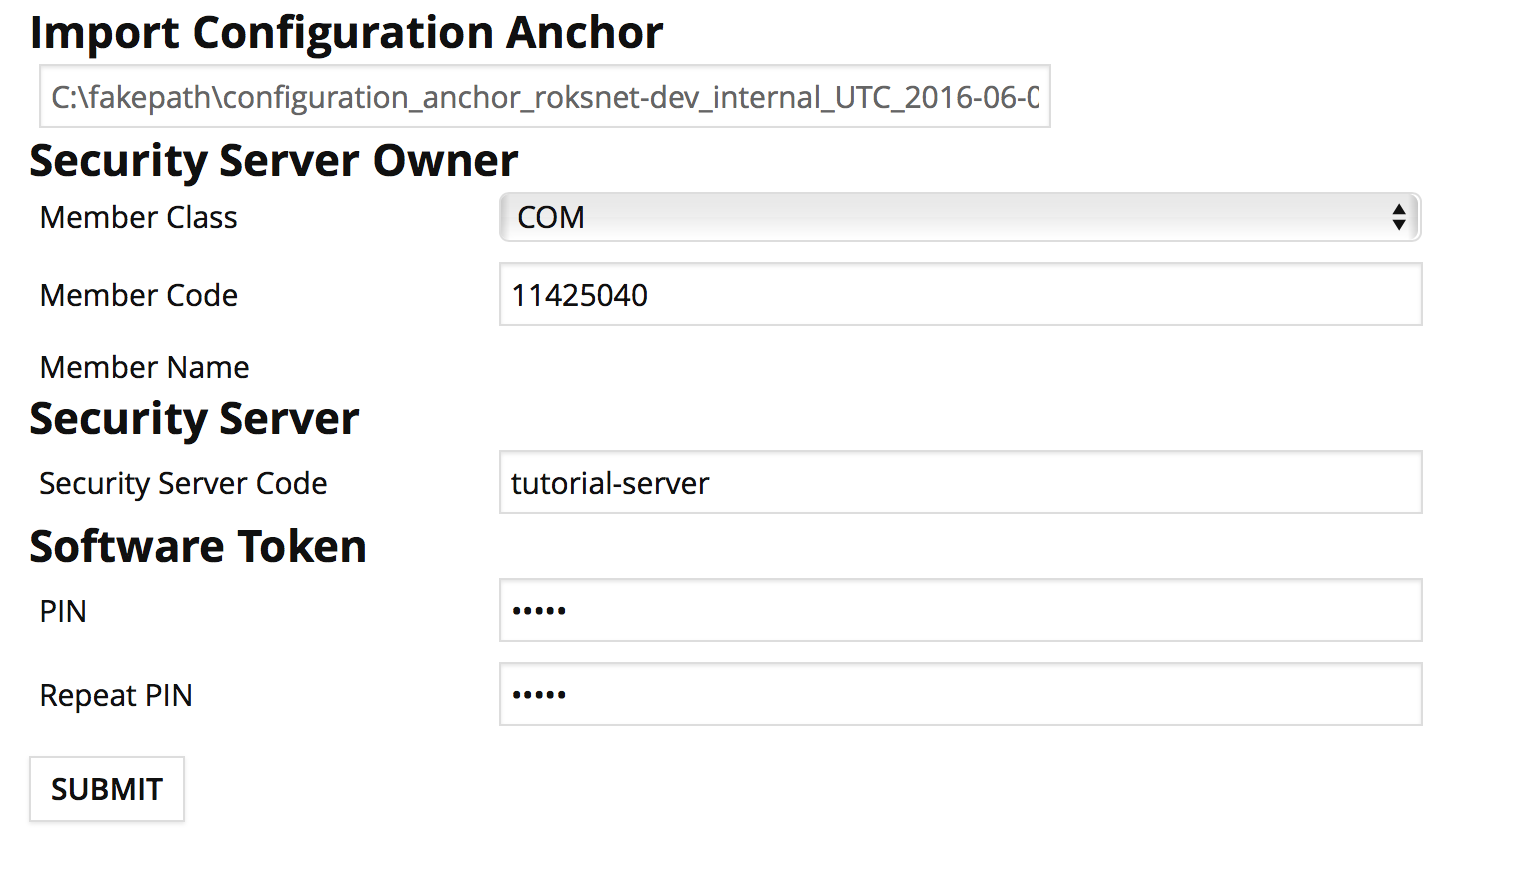
3. If the configuration is successfully downloaded, the system asks for the following information:
- The security server owner’s member class (COM for private sector business, GOV for governmental organization and NGO for non-profit organization)
- The security server owner’s member code (this should be your organization's registry code if it's listed in a registry)
- Security server code (free form, security server code should be unique per member).
- Software token’s PIN (free form - the PIN will be used to protect the keys stored in the software token. The PIN must be stored in a secure place, because it will be no longer possible to use or recover the private keys in the token once the PIN has been lost)
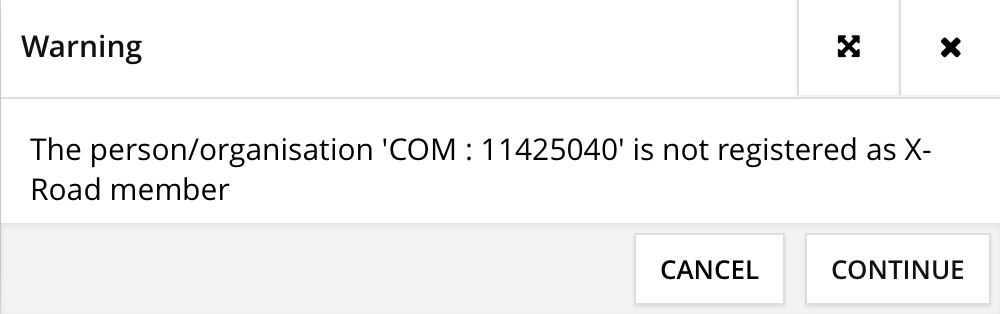
4. The system will prompt a warning. This is fine, as we'll register the member status later.
5. Enter softtoken PIN in the Keys and Certificates view (chosen in step 3.)

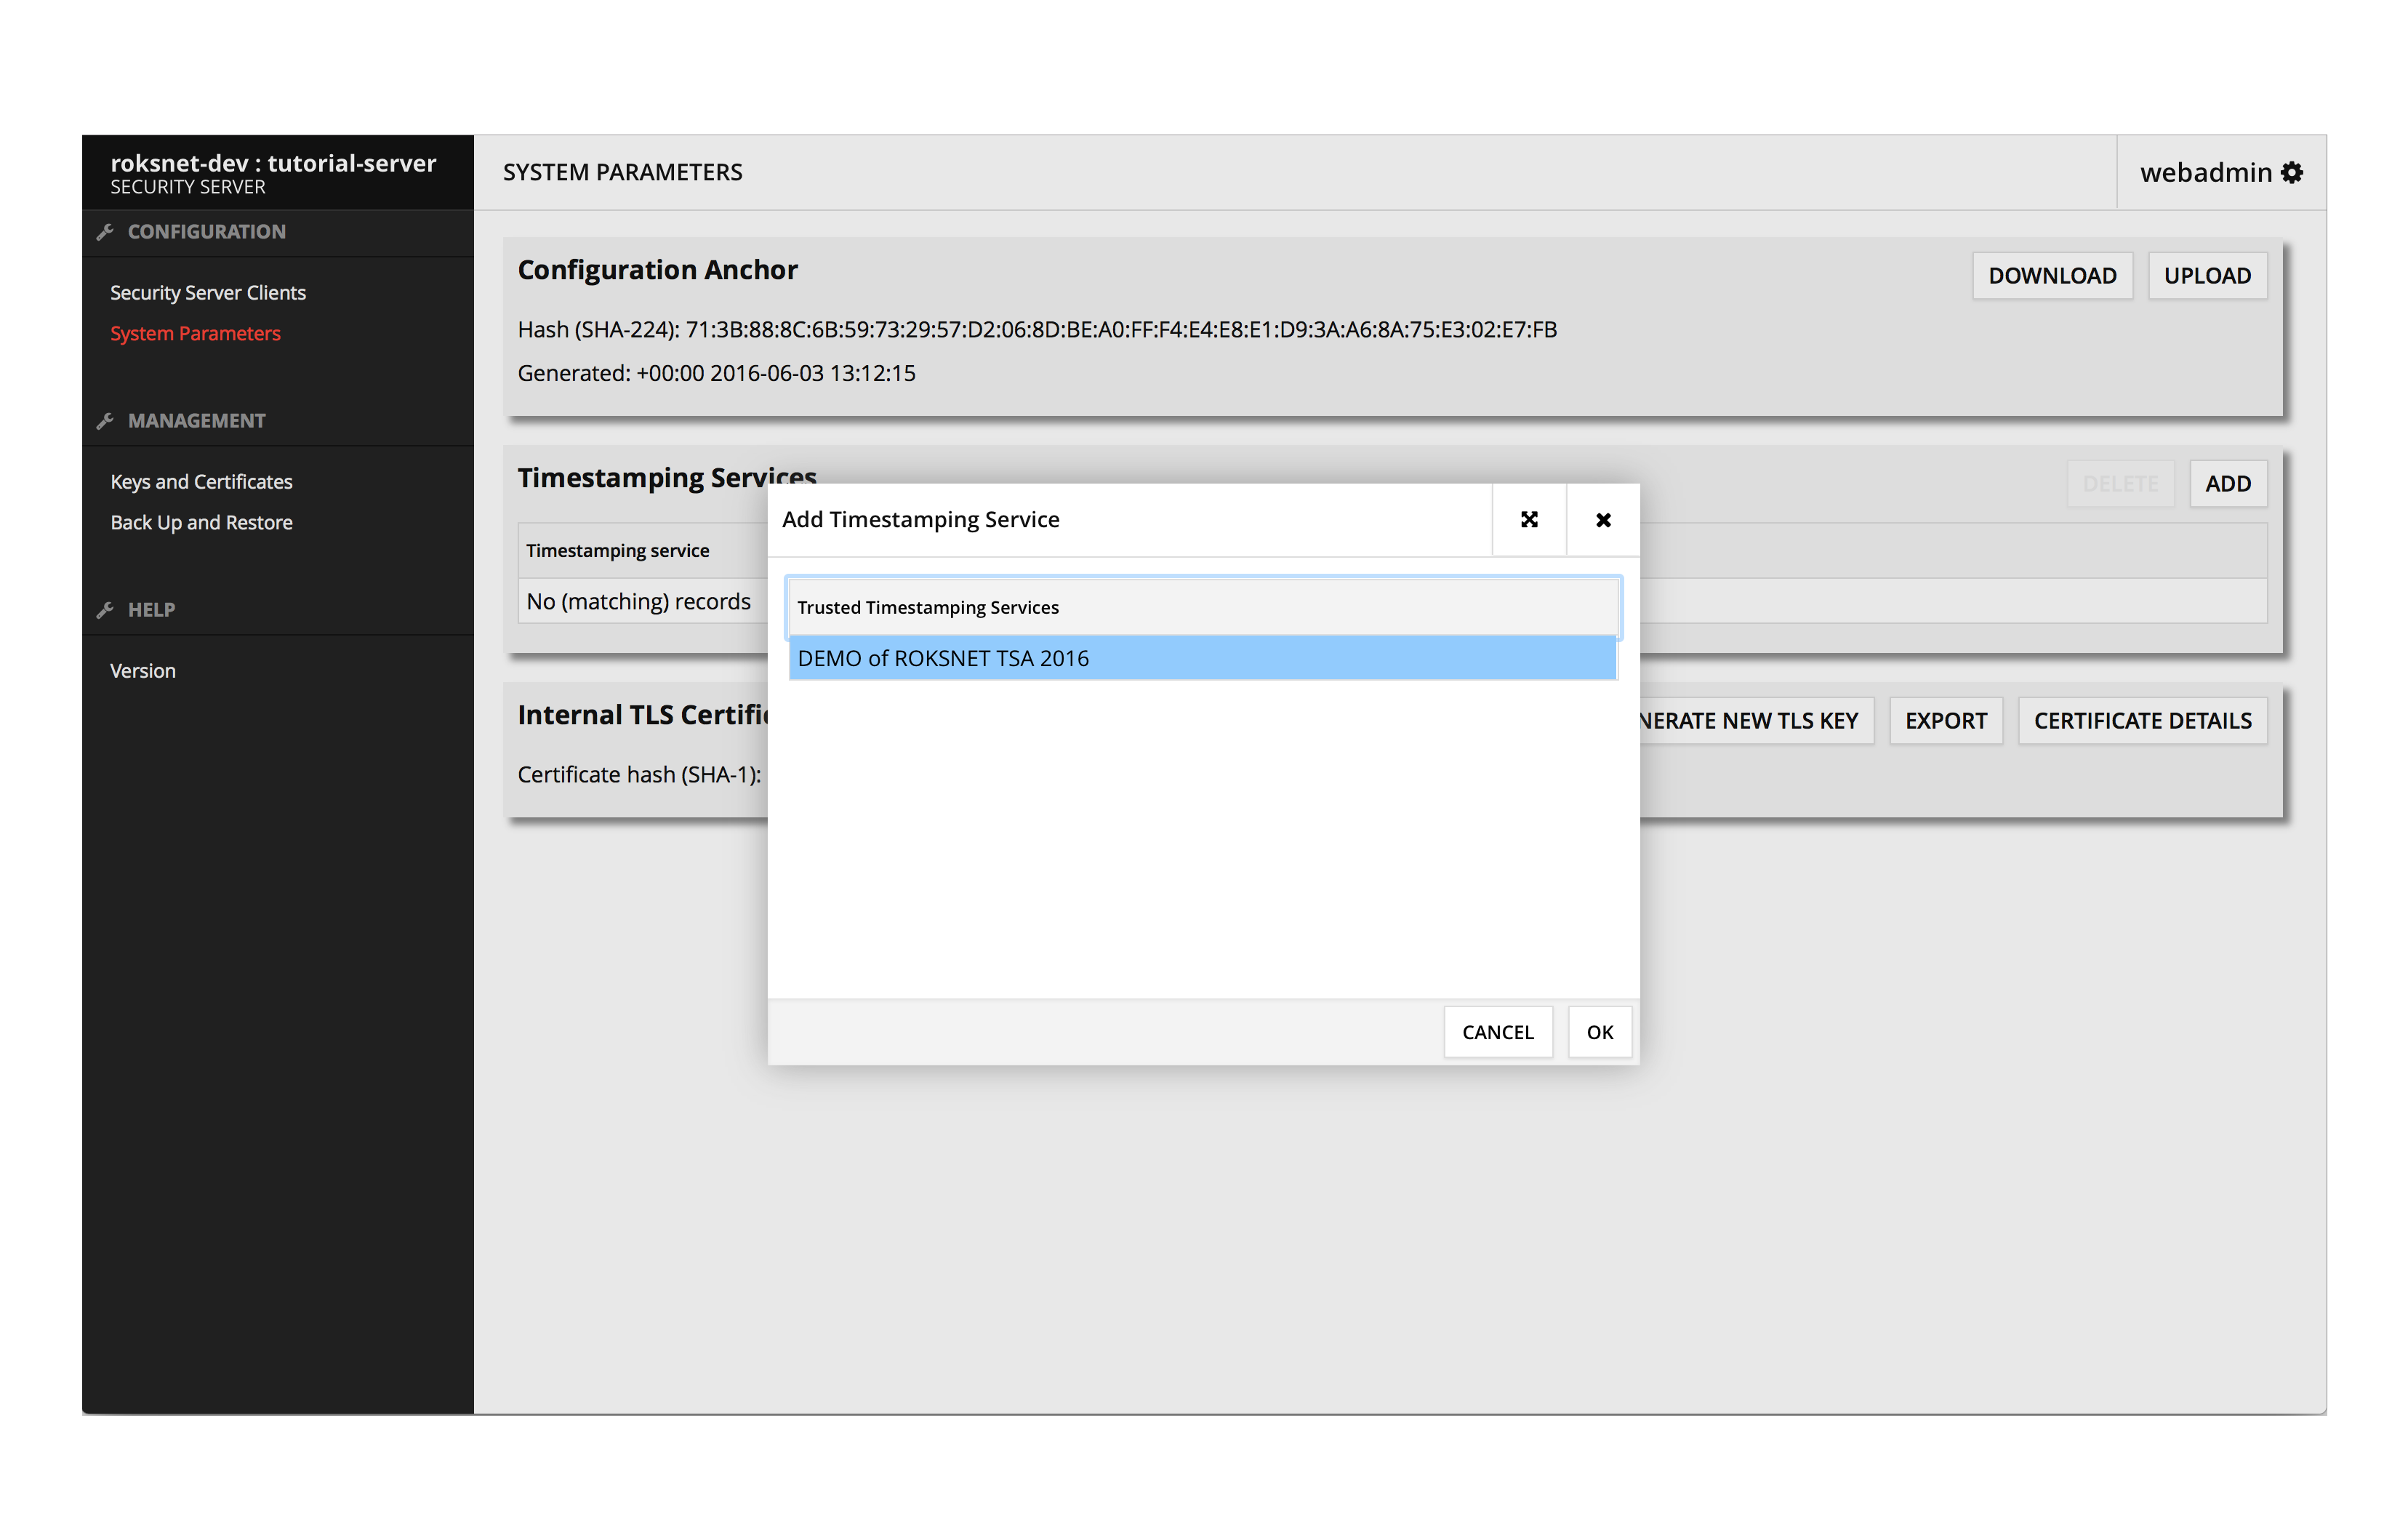
6. Add a TSA in System Parameters view
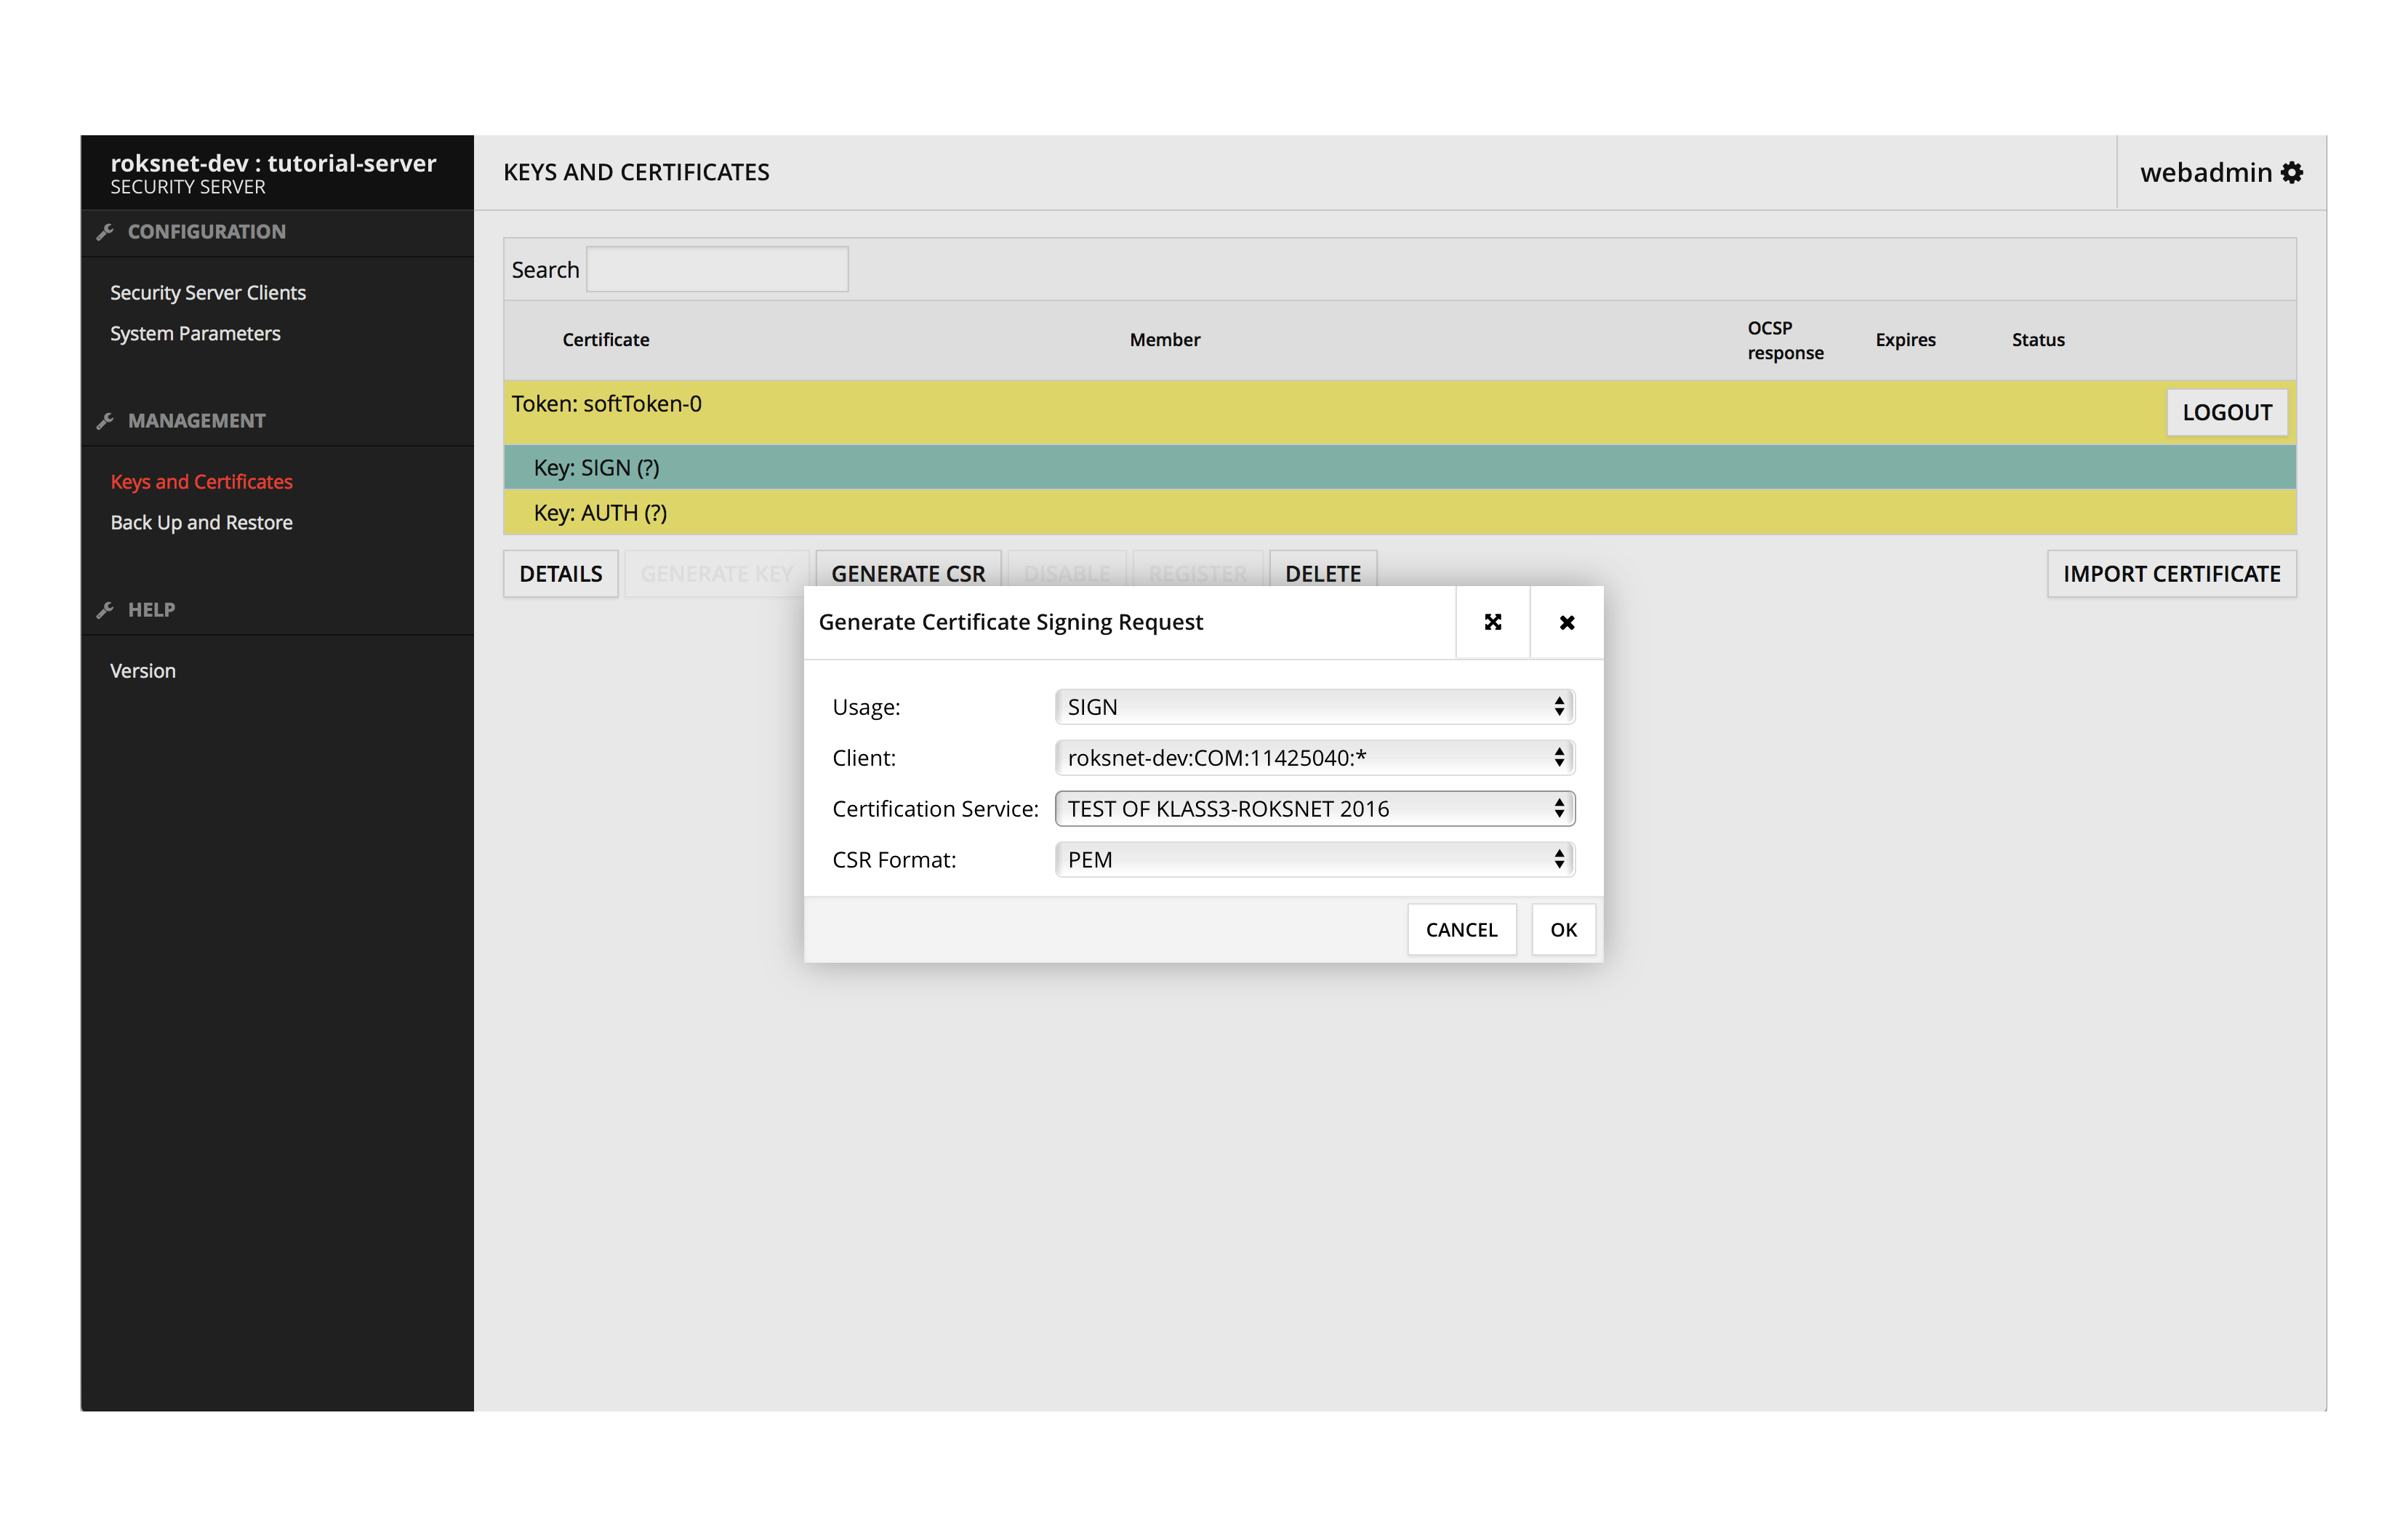
7. Generate keys and certificate requests in the Keys and Certificates view
Security servers use 2 types of certificates
- AUTH certificates for authentication between security servers when initiating a secure TLS channel. AUTH certificates are used 1 per security server.
- SIGN certificates for signing messages. SIGN certificates are used 1 per MEMBER (i.e. organization).
Generate 2 keys by selecting the SoftToken-0 and press GENERATE KEY. Give the key a label and press OK. Your keys should now look similar to this:

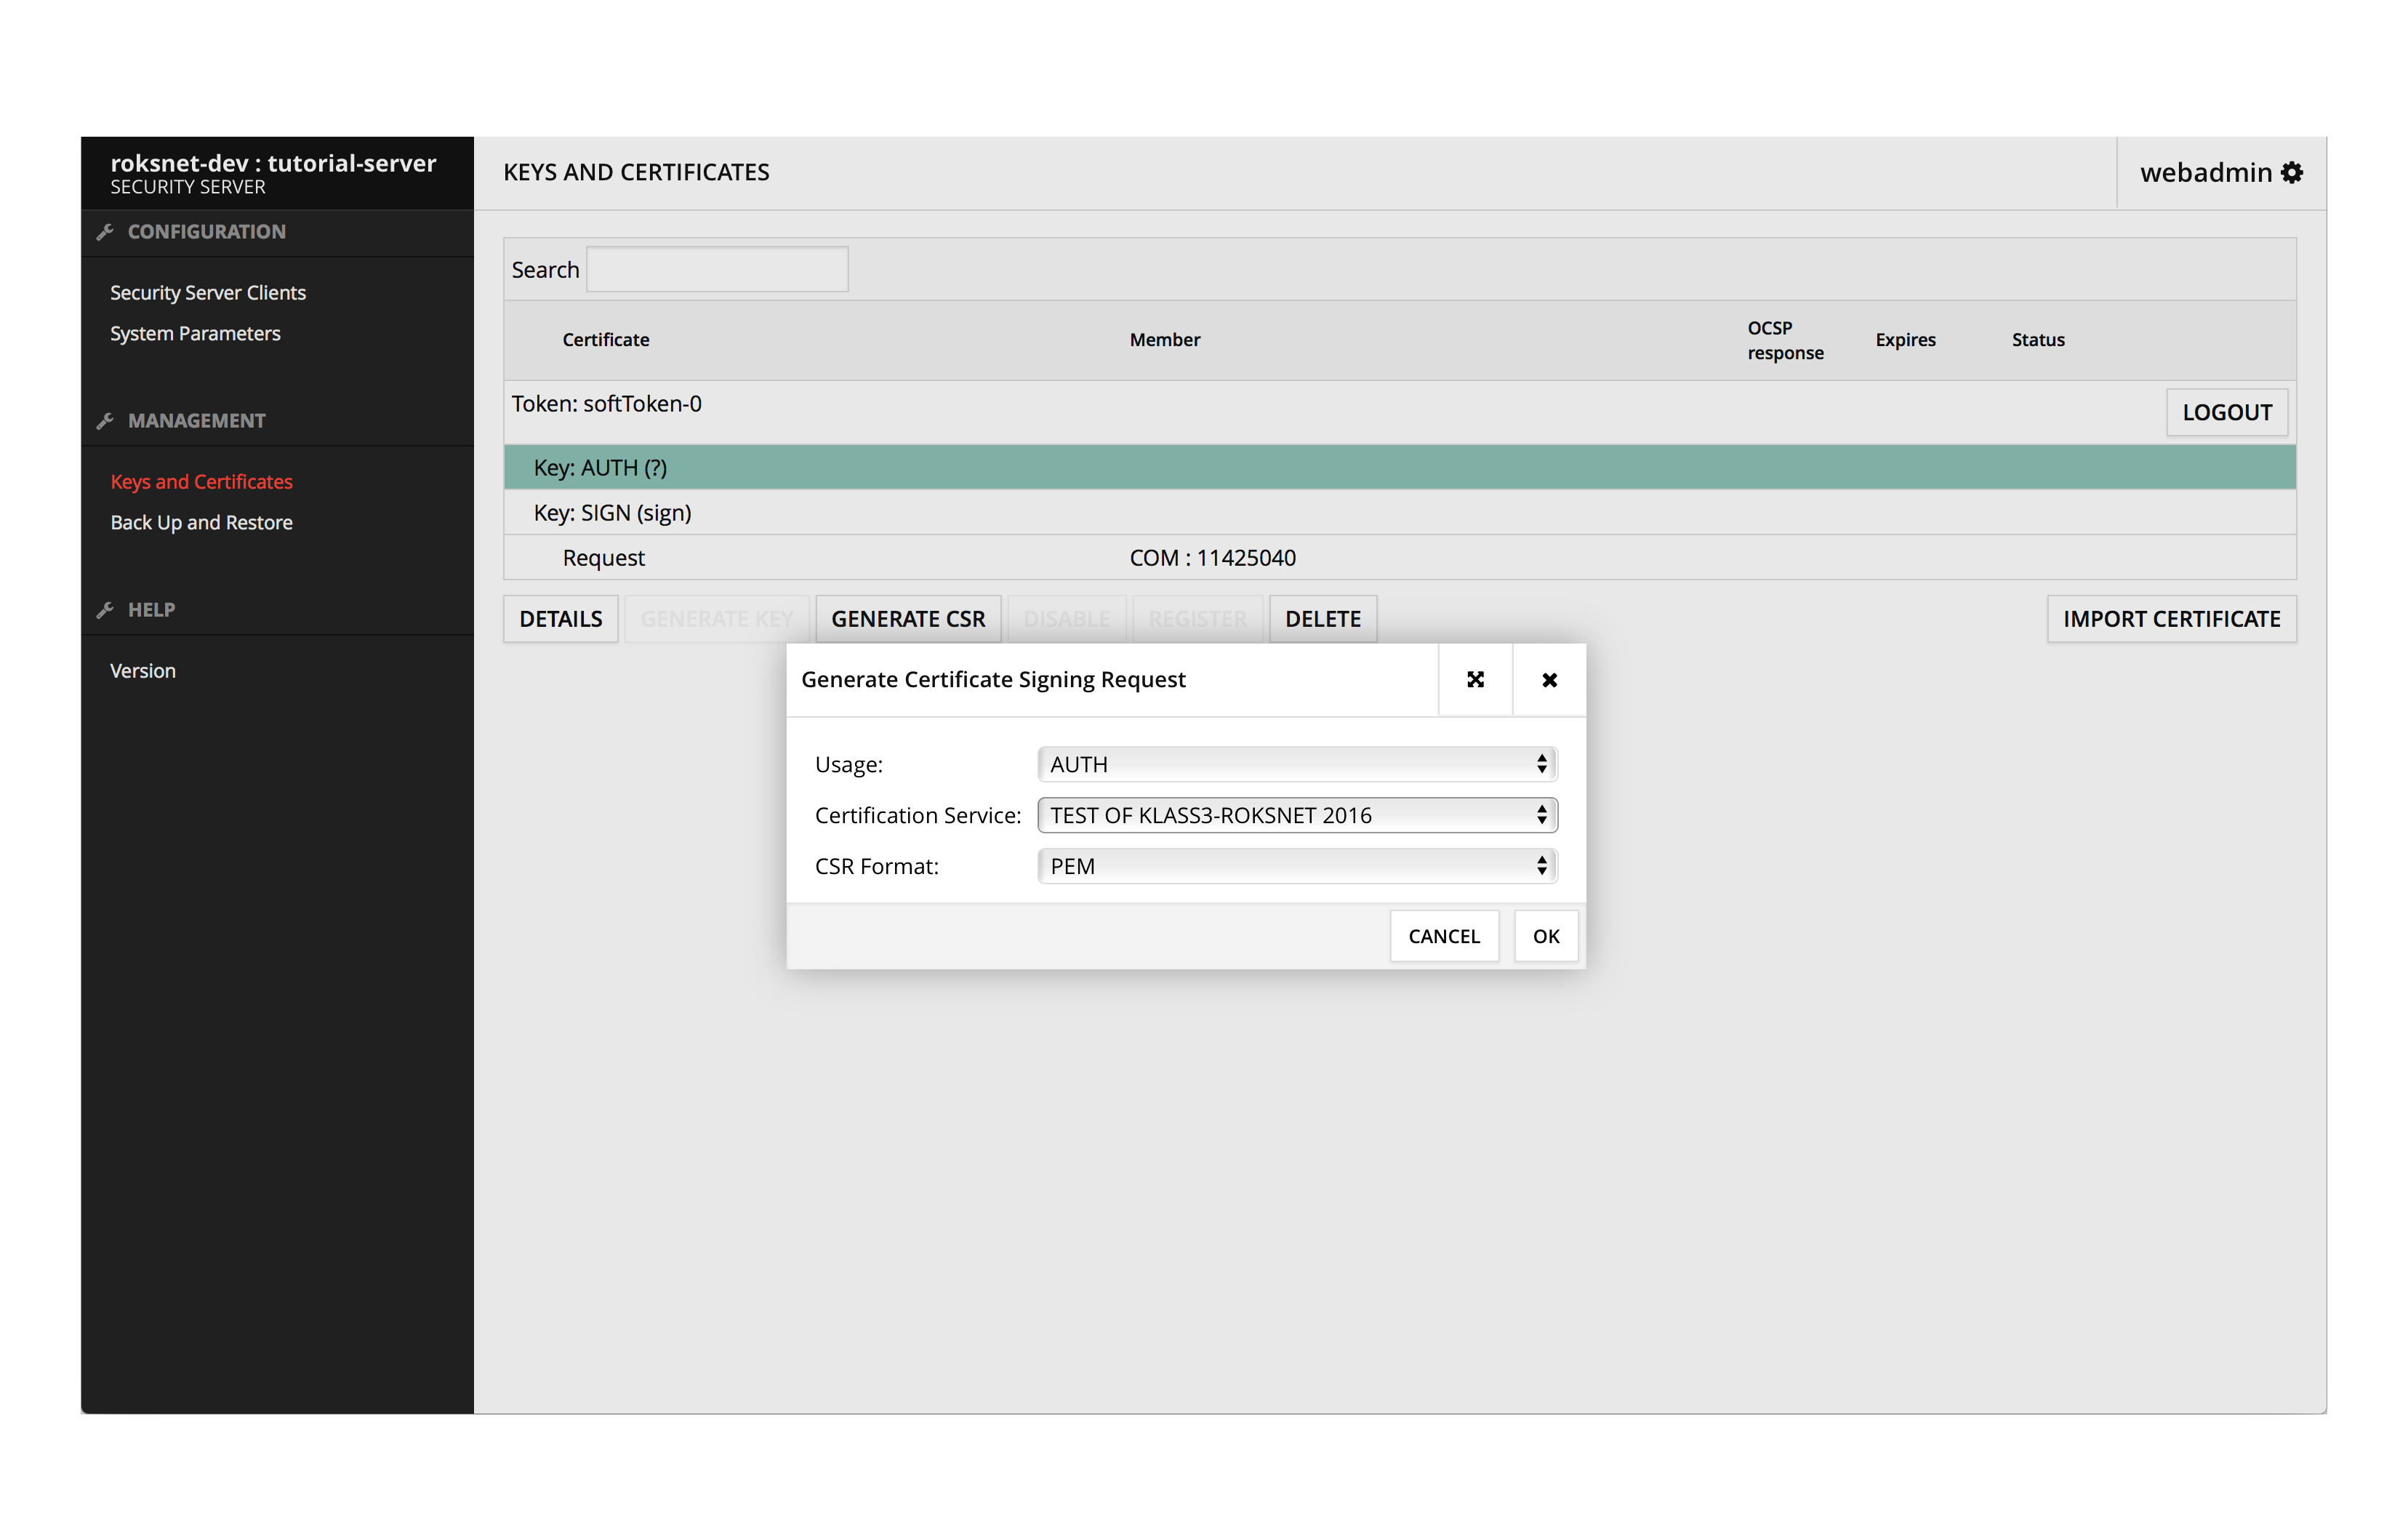
Next, generate a CSR for a SIGN certificate by choosing a key and selecting GENERATE CSR.
Then generate a CSR for an AUTH certificate.
Send the downloaded CSR-s to us at support@roksnet.com with the following details:
- Member name
- Member code
- Member class
- Security server code
We will use the CSR-s to issue you certificates.
Once you have received the certificates you should be able to import them in the “Keys and Certificates” view. After importing them, select the AUTH certificate and press “ACTIVATE” and “REGISTER”. Your keys and certificates should now look like this:
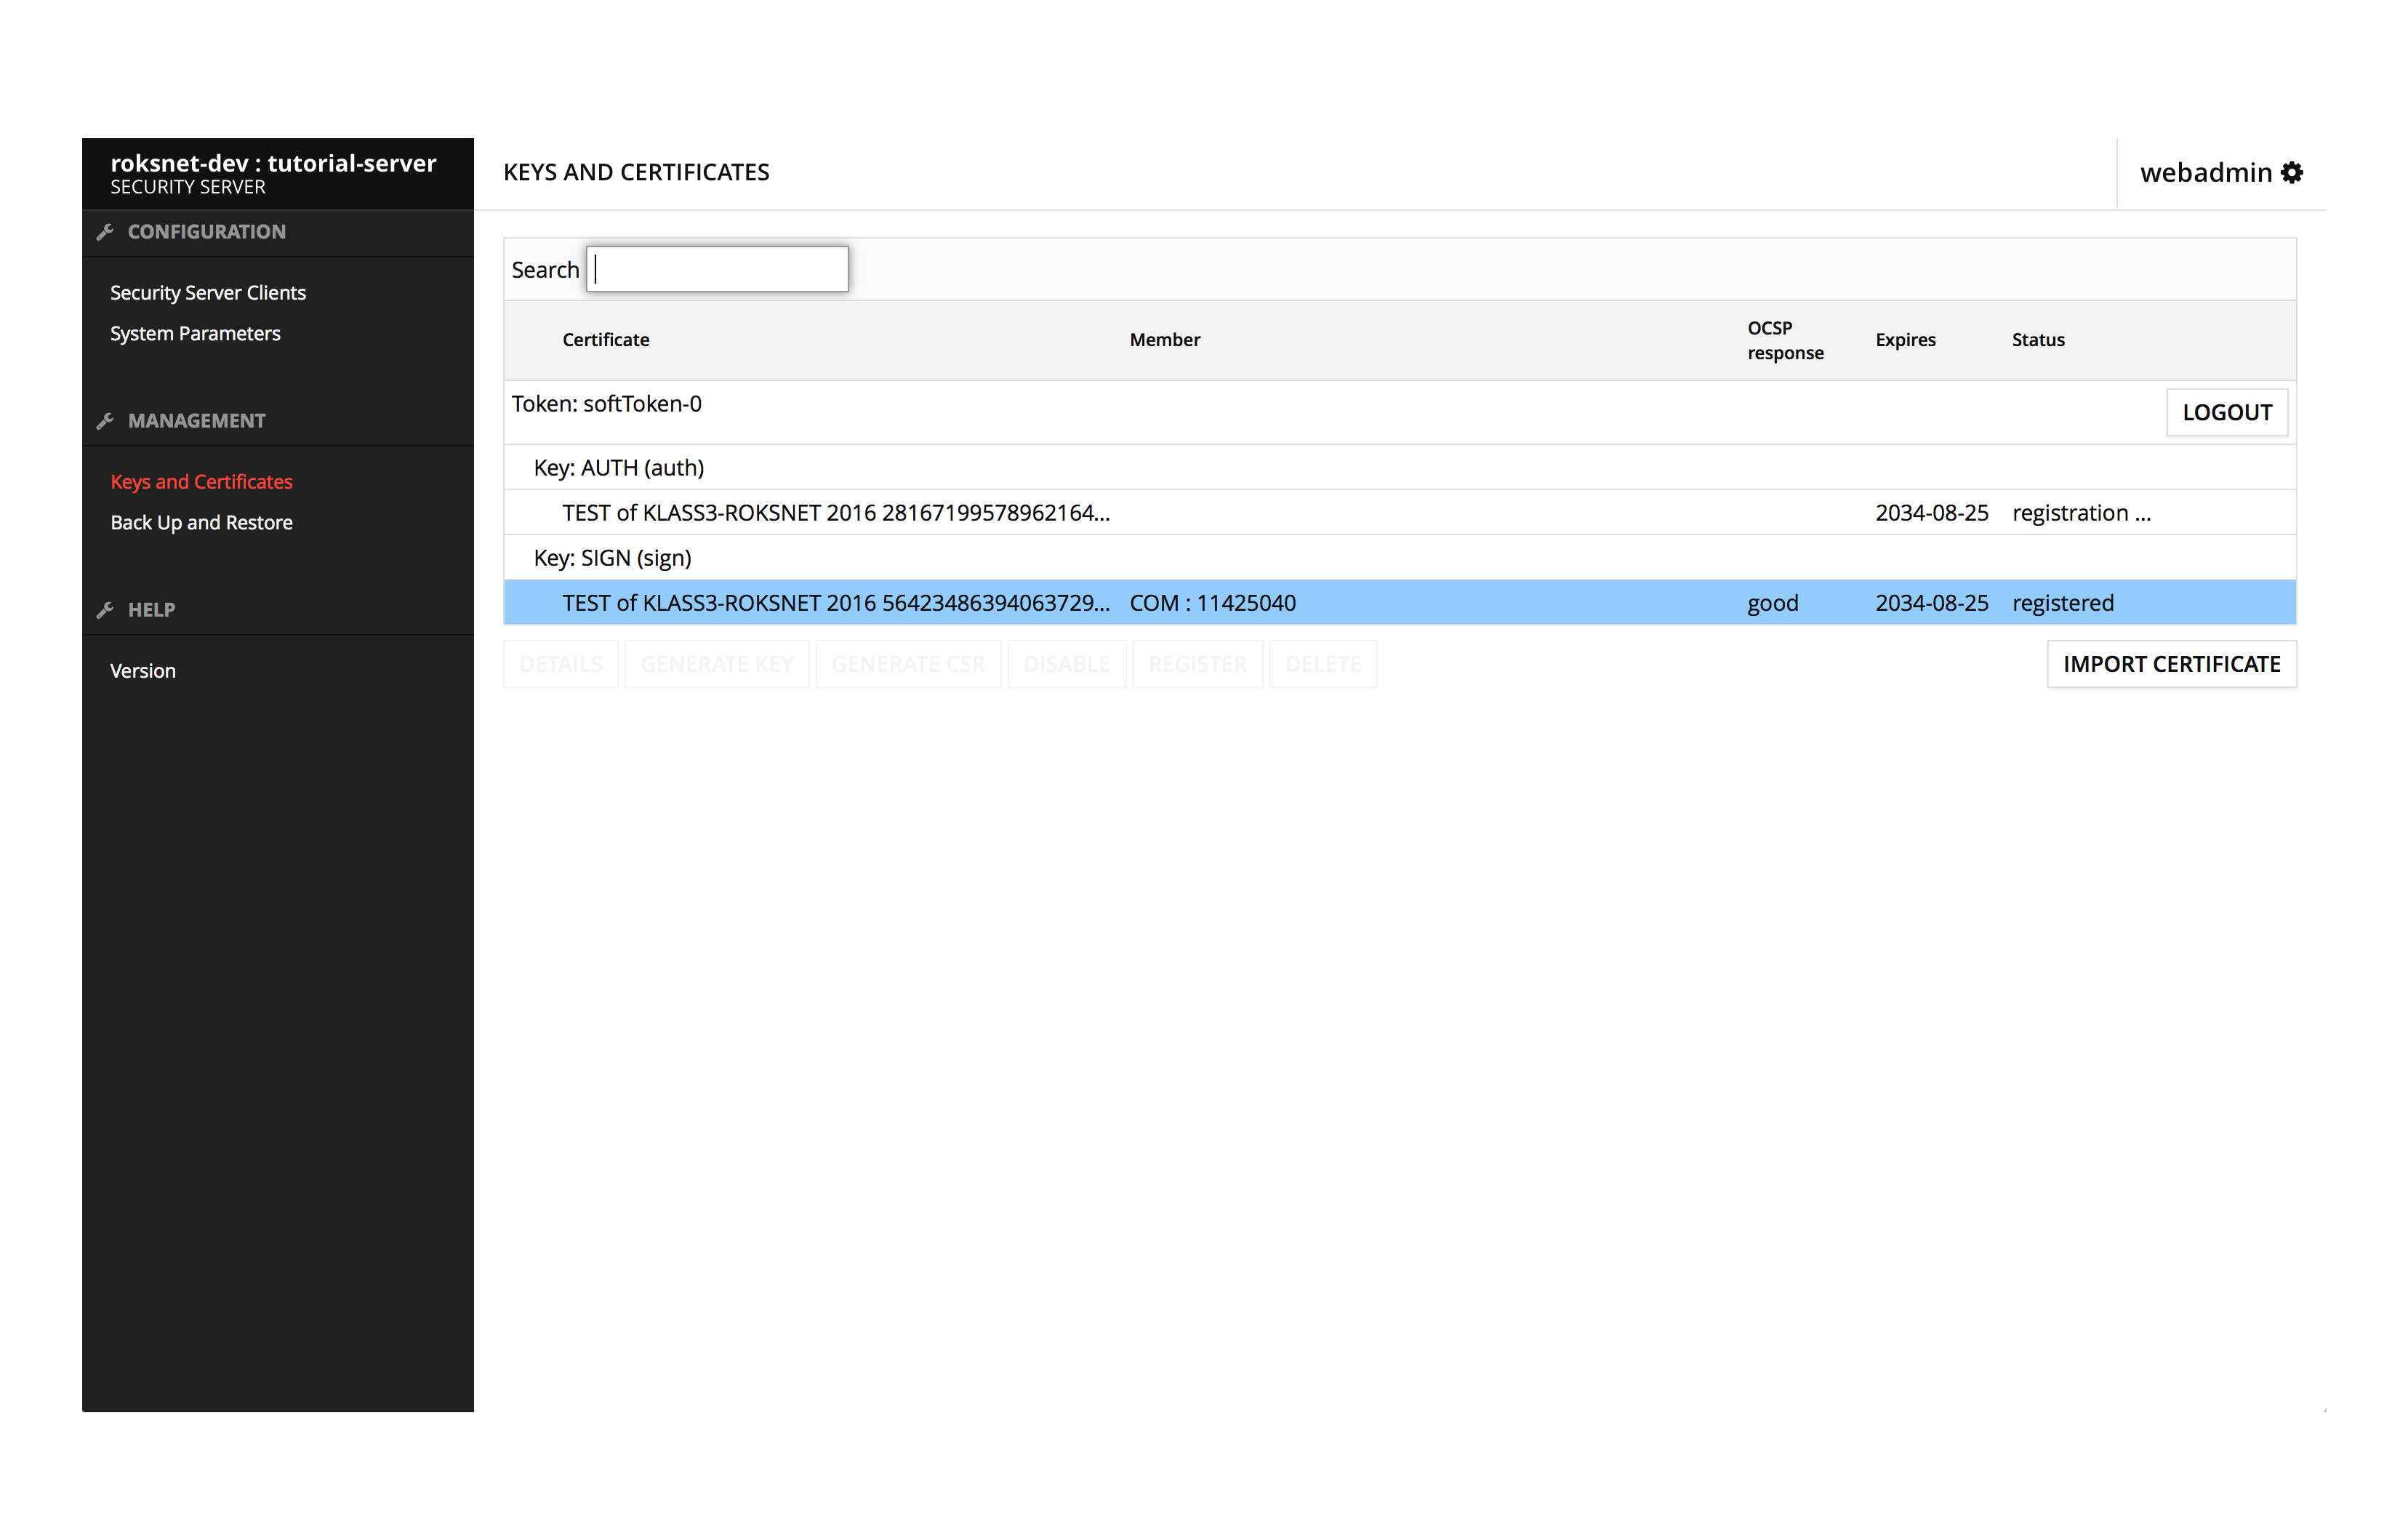
Once we have accepted the registration request in the central server, the OCSP response and status of the AUTH certificate will change to “good, registered”.
The next step would be registering a subsystem. Select “ADD CLIENT” in the Security Server Clients view.
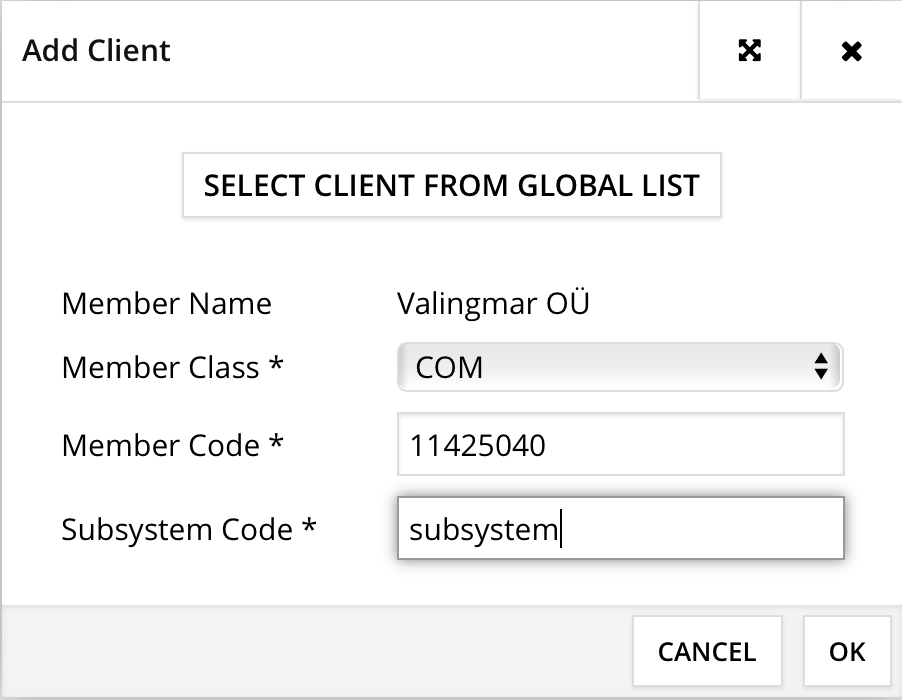
Select “CONFIRM” in the next prompt.

Once we have accepted the registration request in the central server, you'll be ready to consume or provide services on RoksNet's development environment.
Setting up RoksNet Portal
MISP2 (Mini Information System Portal 2) is a universal client application that's easy to set up and makes it easy to consume RoksNet data services without the need to develop one's own information system. It's also a good developers tool, as it makes testing your services easy.
System requirements
| Requirements | Explanation |
|---|---|
| Ubuntu 14.04 64-bit, 4 GB RAM | Recommended system requirements |
| http://apt.roksnet.com/misp2-debs | MISP2 repository |
| http://apt.roksnet.com/misp2-debs/roksnet_repo.gpg | The repository key |
| TCP 80, 443 outbound | For communicating with the security server (HTTPS if over public internet |
| TCP 443 inbound | For access to the web interface |
Requirements to software and settings:
- an installed and configured Ubuntu 14.04 LTS x86-64 operating system (VMs are supported as long as they support Ubuntu 14.04 LTS);
- The enabling of auxiliary services which are necessary for the functioning and management of the operating system (such as DNS, NTP, and SSH) stay outside the scope of this guide.
Installing MISP2
1. All activities during installation are performed as root user, so
sudo -i
2. Configure MISP2 and JDK-8 repositories. To do that, add the following lines to /etc/apt/sources.list.d/misp2.list
deb [arch=amd64] http://apt.roksnet.com/misp2-debs trusty main
deb http://ppa.launchpad.net/openjdk-r/ppa/ubuntu trusty main
3. Download signing key for JDK-8
apt-key adv --keyserver keyserver.ubuntu.com --recv-keys EB9B1D8886F44E2A
4. Add RoksNet's repository's signing key to the list of trusted keys
curl http://apt.roksnet.com/xroad6-debs/roksnet_repo.gpg | sudo apt-key add -
5. Update package lists
apt-get update
6. Install postgreSQL
apt-get install postgresql-9.3
7. Edit the file /etc/postgresql/9.3/main/pg_hba.conf so that postgres user's authenticaton method would be “trust”. It should look like this:
# Database administrative login by Unix domain socket
local   all             postgres                                trust
8. Restart PostgreSQL
service postgresql restart
9. Install MISP2 database package
apt-get install xtee-misp2-postgresql
For testing purposes questions prompted during installation can be answered with default values.
10. Install Java JDK 8
apt-get install openjdk-8-jdk
11. Add JAVA_HOME variable
export JAVA_HOME=/usr/lib/jvm/java-8-openjdk-amd64
12. Install MISP2 application
apt-get install xtee-misp2-application
Quite a few questions will be asked during this installation.
- Do you want to update SK certificates - answer “n”
- Do you want to configure as international version - answer “y”
- Please provide database host IP to be used - default answer
- Please provide database port to be used - default answer
- Please provide database name to be used - default answer
- Please provide username to be communicating with database - default answer
- Please enter username password - enter password chosen at step 9
- Do you want to configure signing and encrypting of Estonian ID-card certificates - answer “n”
- Do you want to enable authentication with Mobile-ID - answer “n”
- Please provide SMTP host address - answer default, won't be using for testing purposes
- Please provide server email address - answer default
- Please provide x-road v6 instances (comma separated list) - type “roksnet-dev”
- Please provide x-road v6 member classes (comma separated list) - answer default
- Do you want to add new administrator account - answer “y”
- Do you want to enable HTTPS connection between Misp2 application and security server? - answer “n”
13. Edit the file /var/lib/tomcat7/webapps/misp2/WEB-INF/classes/config.cfg with the following content:
#Authentication settings
auth.password=true
auth.IDCard=false
auth.IDCard.OCSPCheck=false
auth.mobileID=false
auth.externals=false
auth.sslid=false
auth.certificate=false
This enables password authentication. Browser certificates (auth.certificate) would also be fine for testing purposes, but passwords are easier to use.
If you would like to, you could also change the country code.
#If no suitable countries are defined, then uses system default locale country
countries = [ISO code of your country, e.g. "GB"]
14. Edit /etc/apache2/sites-available/ssl.conf with your IP aadress to gain access to the admin interface. It should look like this:
    <Location "/*/admin/*">
        Order deny,allow
        Deny from all
        Allow from 127.0.0.1 192.168.1.90
    </Location>
15. Restart apache2.
service apache2 restart
Configuring MISP2 from the web interface
1. You should now be able to log into MISP2's admin interface at https://server_ip/misp2/admin. Use the administrator account you created during installation to log in.
2. When logged in, under Portal management, select “Add new”
3. Fill out the forms with the following information:
- Portal name (EN) - free form
- Portal short name - system name, free form
- Portal type - Organizations portal
- Organization name (EN) - Name of your organization
- Organization code (x-road member code) - Member code (must match member code in security server)
- X-road protocol version - 4.0
- X-road instance - roksnet-dev
- X-road member class - Your member class (must match member class in security server)
- X-road subsystem code - Your subsystem code (must match subsystem code in security server)
- Security host - http://security_server_ip
- Services sending address - http://security_server_ip
- Debug mode - off
- Send audit log to security server - unchecked
- Use topics - unchecked

After filling out the forms, hit “Save portal configuration”.
4. Select “Add new manager”.
5. Fill out the forms and hit “Add new person as manager”

6. Choose “Exit” at upper right corner.
7. Log in with the user you just created at https://server_ip/misp2
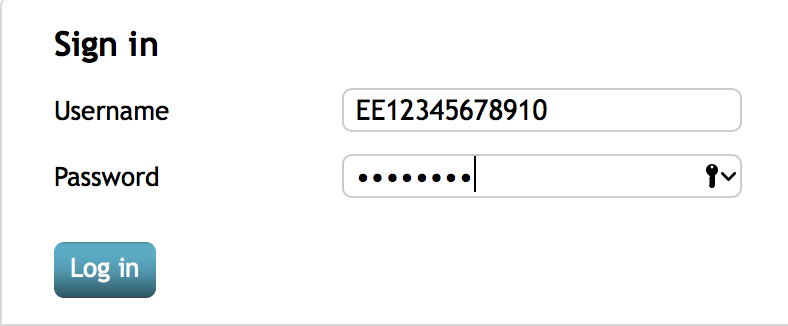
The username must be enter as [countrycode+serialnumber].
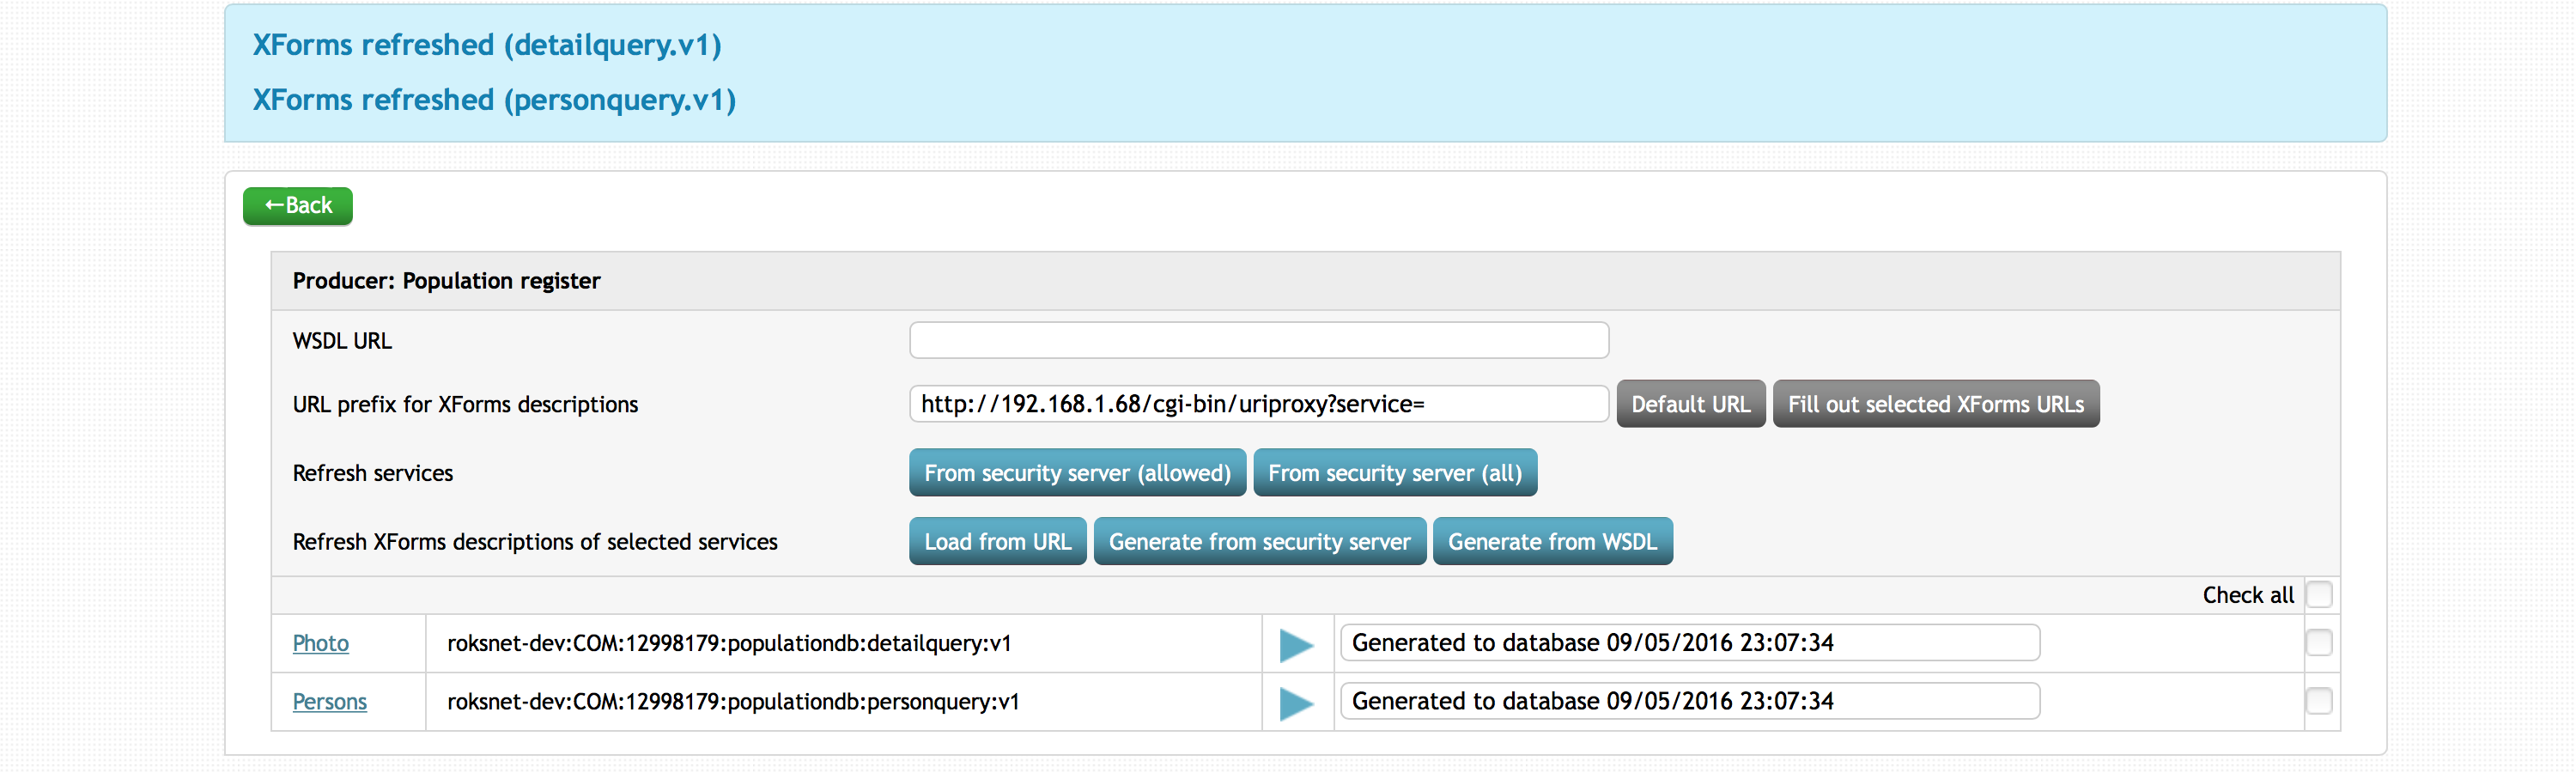
8. Select “All producers” → “Refresh producers”, check the following boxes and hit “Save active producers”.

9. Select a producer, hit Refresh services → From security server (allowed).
This will send a metaquery from MISP2 to your security server, which will proxy it the the producer's security server. As a response, the producer's security server will send a list of allowed methods for your subsystem.
10. Check all services and hit Refresh XForms descriptions of selected services → Generate from security server.
This will generate XForms based on the services WSDL-s.
11. Hit the play button on a service to test it.
You're now able to consume RoksNet data services via MISP2 :)
Data service development
Developer documentation
RoksNet data services are based on SOAP. Information about X-road specific requirements are in the following documents:
- Message Protocol v4.0 - http://x-road.eu/docs/x-road_message_protocol_v4.0.pdf
- Service Metadata Protocol - http://x-road.eu/docs/x-road_service_metadata_protocol.pdf
Example SOAP server and client
Source code of example: pyxadapter_1.0.tgz
The demo application is written in Python. Installation instructions are in included in the package (see INSTALL.txt)
The example SOAP server accepts input messages in both X-road protocol 3.1 and 4.0 and formats response message according to the same protocol which was used by the client. The application contains source code of Population Registry, Passport database, Vehicle database, Company database and Prescription database demo services which are available in RoksNet test environment.
To create a new SOAP server for service provider:
- create SOAP server instance for SOAP server (example: pyxadapter/companydb_server/init.py)
- include service registration function and define routing for new SOAP server in pyxadapter/init.py
To create a new service in the SOAP server:
- create service implementation function serve() (example: pyxadapter/companydb_server/simplequery.py)
- import and registrate service implementation module (example: pyxadapter/companydb_server/init.py)
- create service description WSDL (example: pyxadapter/static/companydb_v4.wsdl)
- publish service in Security Server and grant access to clients
To create SOAP client:
- create X-road client class (corresponding to a service provider) with methods corresponding to services and start calling those methods (example: pyxadapter/client/companydb.py)